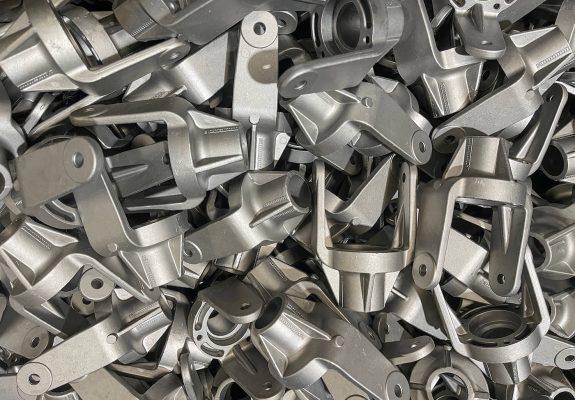
A pressure die casting tool explained in simple terms: if you had a component that needed to be cast you decide where on the component you would split it in half, two blocks of steel would surround the component and meet flush around the component and where you have determined where the split on the component is, you “remove” the component and the void which remains is your die cavity. A die tool then requires an entry point and channel called a runner/feed for the molten metal to enter the tool and into the die
cavity. The remaining basic requirement needed are small pockets or voids around the die cavity to allow the molten metal to push any air into once it has filled the die cavity, these are called overflows/vents which typically break off easily off the component after the metal has solidified. Die design (and component design for die casting) is considerably more
complex than what is stated above and we will continue to go into more detail below.
A die casting tool can be as small or large or as simple and complicated as required and is primarily dictated by the design of the component as well as economies for manufacturing, it is wise to learn about designing for die casting and working with an experienced pressure die caster such as Midland Pressure Diecasting when designing new components as a die casters input will be vital to development of component design for feasibility of production die casting.
The following technical information we offer as a brief overview for designing for die casting, there is much more to component and tool design than what is outlined here and by working with Midland Pressure Diecasting we can offer more technical design input into any project and you can be assured that your project will be in safe hands.
A die casting tool comprises of two steel blocks which when assembled together form the complete die cavity required to cast a component. The split on the component has a direct bearing on the design of the die tool and can alter costs considerably as well as affect future tool maintenance and upkeep.
A die casting tool can be manufactured from a range of tool steels and careful consideration should be made into the requirement of life expectancy of the tool. A designer needs to consider tool life, how long will the tool be in production? The volumes of die casting supply need to be considered as this will have an impact on the wear on the tool. The process of die casting means a die casting tool needs to be able to withstand quick temperature increases and sudden temperature decreases many times an hour, sometimes many times a minute, throughout a production run. For large scale operations this can be an ongoing non-stop cycle.
Because a die tool is effectively one tool split into two halves there must be a corresponding split (split line) on the casting. The position and location of the split line on the casting needs to be in the most effective place as to cause minimum disruption down the line. Having a split line on a face will leave a witness line which will require secondary process operations to remove if needed which adds to the cost of the component. If the witness line is on an a-face (highly cosmetic and expected to be free of defects) then it is advisable to design for the split line to be moved to another area on the casting, this principle is doubly applicable if the surface is required to be porosity free.
The location on the split line will also have a bearing on the long-term condition of the die tool (and corresponding press clip/trimming tool where applicable – a secondary tool required for the removal of un-required excess metal such as the metal feed and overflows). Over time areas on the tool will be prone to die erosion and wear so consideration should be input at the design stage to have these in places where they will have minimal impact on the component requirement and application.
A tool designer will provide recommendations for the best split lines but a component designer should also have some input in the best places to consider for product application and also assembly with mating components.

One of the most basic principles in designing for a die casting is the provision for positive draft/draw taper. Avoid creating surfaces perpendicular to or with negative draft taper to the die face line, negative draft will be impossible to cast without additional sliding cores creating the feature, perpendicular surfaces do not allow the ideal condition to allow the die to open without potentially causing damage to the solidified casting and also damage to the casting upon ejection from the die face. Risk of sticking of metal to the die impression or dragging on the component may also occur due to not having enough draft taper on the component/die cavity impression. An allowance of at least 0.5 degree of draft taper (the more the better) will make a huge difference for casting consistency and production efficiency.

As with any design methodology consideration should be put into component geometry, why is the casting shaped as such, does the component need to be so “heavy.” The weight element is important in die casting (as with any process which requires the provision and processing of raw material). In first instance it determines how much material will be required in producing the part which constitutes towards the price of the casting. Die cast machines come in various sizes and configurations which determines whether they are capable of producing a die casting. Wall section of a casting has an impact on the tool design, how the molten metal will fill the cavity of the die, how the metal will solidify in the
die cavity, how long it will take to solidify etc.
Wall thicknesses of 2-3mm for aluminium and 1mm for zinc are typical examples and are subject to the component design and application. Consideration for wall thickness should allow for radiuses where sections intersect at a sharp angle for strength of the component in that region, durability of that feature on the die tool and to aid in molten material flow within the die cavity. Ideally wall section thickness should be the same throughout the whole of the component (although in actual application this is sometimes difficult) as changing from thin section to thick section can cause cavity filling and surface finishing issues.
The cavity in the die must be filled with metal very quickly, the general timing is between one hundredth and one tenth of a second and this is dependent on the casting size and design. The wall thickness aided with radiuses will allow smoother metal flow to minimise turbulence to prevent surface imperfections. A shorter die cavity fill time will aid in providing a better surface finish on the casting.
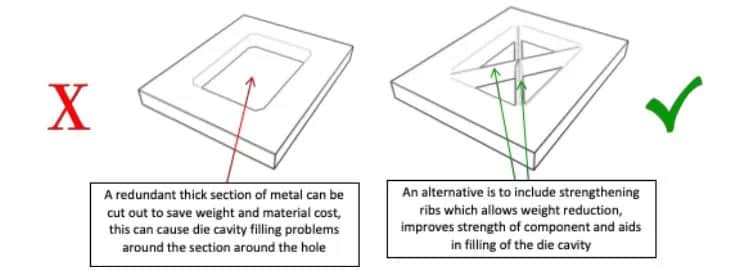
Also when molten metal solidifies the volume of molten metal in the die cavity will shrink as it cools, liquid metal must be available to fill the space created otherwise a shrinkage void will remain which is why it is best to avoid sudden variations in wall thickness and avoid thick wall sections completely where practicable.

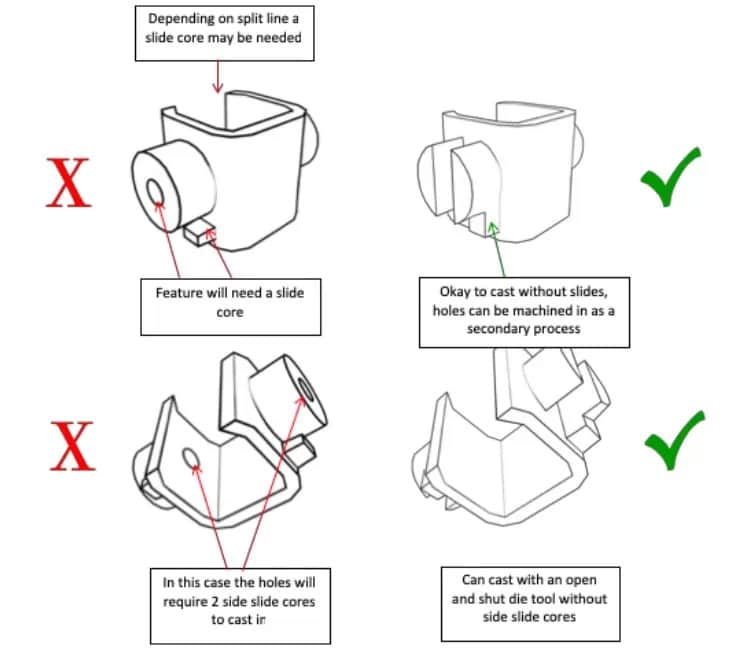
Consideration of complex/undercut features within the component design at early stages will save a lot of time later on. Complex forms, cored holes and undercuts can be a cast in feature and calls for the implementation of sliding cores which in one way can be designed to slide into position via angled guide pillars mounted onto one die half which locate the slide core blocks on the opposite die half to move into position when the die closes and opens. These slide cores can also be hydraulically operated with the use of cylinders. It is always preferred to avoid moving cores where possible as they add cost to the die tool, they reduce casting cycle times and they also add into the probability factor for operation and maintenance of the tool – they can be cause for variability on the casting dimensions which require stringent quality control monitoring for critical areas and because they are a moving part they are prone to wear and require maintaining.

Secondary processing can be greatly reduced by using cores in the die tool to cast holes at the casting stage. Small holes can be cast in, they can also be cast without taper though consideration for tool life and maintenance as well as production need to be considered for viability to implement such casting designs.
An excellent alternative to having areas of thick material on a casting is to include strengthening ribs which will provide added strength to a component whilst in some applications also allowing the removal of material within the same region for the benefit of component weight reduction. The ribs should be designed in a way to allow molten metal flow to aid in die cavity filling, they should also be rounded and blended (with rads) to further enhance metal flow and reduce chances of the casting sticking to the die face upon metal solidification and ejection.

Small features/sections on a die impression such as a sharp edge or a protrusion such as a core for a hole may be prone to overheating which can lead to issues to cause drag marks and porosity depending on the component and how the die is designed. Such features should have thought put into alternative design as in the long run chances of tool breakage and maintenance can be vastly reduced to benefit in longer tool life.

Although smooth surface finishes on a casting are achievable as cast, certain applications may need additional machining in order to provide the desired surface finish. Further surface preparation is advisable for castings which require powder coating, an alternative feature is to add texture to the die surface but this is component dependent. For secondary processes such as linishing and polishing, where applicable simple, flat-section surfaces are preferred and areas with blind holes and recesses should be avoided as they tend to trap abrasive/polishing compounds which causes problems when plating parts. Large flat sections should be slightly curved (convex/concave) as they provide a smooth uniform surface to ease processing when linishing and polishing. Sharp junctions should be avoided in a casting required for electro plating as are blind holes, v-like grooves and upstands, such features should be designed with radiuses to allow even plating thickness to deposit, reduce plating times and increase durability of the plating, this also applies for castings which require powder coating. If lettering is to be cast in on a component these are better off to be a raised feature on the casting rather than sunk in, this will also benefit the durability of this feature on the die tool.
Threads in castings can be cast in, this is more suited to zinc die casting as the material allows for fine cast in detail. Consideration has to be put into production efficiency due to the configuration of the die tool required to cast threaded parts reduces the cycle time and makes the tooling more expensive.
Where required, for strength applications for example, inserts can be cast into a die casting. The die tool needs to be designed in a way which allows the insertion and retention of the inserts upon each die opening cycle and clearance for molten material to cast around the inserts sufficient enough to provide enough strength for their product application without breaking out the casting, consideration also needs to be made for correct seating so the insert is always cast in the correct position on every cycle. Casting with inserts slows down the cycle time which increases component cost so a designer should consider whether this is necessary at the cast stage or whether an insert can be assembled in a secondary process.